2021. 1. 20. 17:54ㆍReactNative

지난 포스팅까지 해서 우리는 네비게이션까지 장착한 자동차를 얻은 것이다.
[React Native] ② Navigation 설정 및 프로젝트 구조 잡기
React Navigation React Native(이하 RN)에서 네비게이션을 구현하는데 사용되는 많은 라이브러리들이 존재한다. 그 중 대표적인 것이 React Navigation이다. 난 이것을 사용해 지난 포스팅에 생성한 RN 프로젝
bgradecoding.tistory.com
이제 차의 겉면을 장식할 차례이다. 디자인도 예쁘게 뽑고 썬텐도 해야한다.
그것을 도와줄 친구가 바로 React Native Elements 이다.
React Native Elements | React Native Elements
Cross Platform React Native UI Toolkit
reactnativeelements.com
React Native(이하 RN)을 위한 UI 라이브러리는 여러가지가 있다.
그중 2020년을 기준으로 많이 사용된 순을 확인해보면 아래와 같다.
1. React Native Elements : Github Stars: 19,500
2. Material Kit : GithubStars: 4,700
3. React Native Base : GithubStars: 14,300
4. Vector Icons : GithubStars: 14,000
5. React Native Paper : GithubStars: 6,600
6. Gifted Chat : GithubStars: 9,800
7. Ignite CLI : GithubStars: 6,600
8. React Native Material UI : GithubStars: 3,600
9. React Native Maps : GithubStars: 11,500
10. Lottie : GithubStars: 13,400
10. Teaset : GithubStars: 2,500
출처
11 Top React Native Component libraries to Use in 2020
React Native was released in 2015 by Facebook, allowing developers to use React JS with native platfo...
dev.to
순위가 이렇고 Document도 깔끔하고 많이 쓰이는 React-Native-Elements를 사용해서 프로젝트의 디자인 구성을 잡아 보도록 하겠다.
설치
일단 React-Native-Elements를 설치하자
yarn add react-native-elements

# or with npm

npm install react-native-elements
yarn을 사용한다면 위 명령어를 사용하고 그게 아니라면 npm으로 설치하면 된다.
이제 React-Native-Elements를 적용해 보자
프로젝트 구조 잡기
우리가 앱을 만들때 버튼이 필요하거나 이미지가 필요하거나 기타 UI적인 요소들이 필요할 때 마다
React-Native-Elements의 component를 가져다가 개발하면 된다.
초기에 세팅해야할 것은 테마이다.
테마는 기본적으로 프로젝트에서 제일 많이 쓸 색이나 폰트 기본적인 UI component 디자인 등을 전역으로 해두고
디자인을 빠르게 적용할 수 있다.
일단 프로젝트의 App.tsx를 열어 보자
import React from "react";
import { NavigationContainer } from "@react-navigation/native";
import { createStackNavigator } from "@react-navigation/stack";
import * as pages from "./src";
import { ThemeProvider } from "react-native-elements";
import { mainTheme } from "./src/resource/style/MainTheme";

const Stack = createStackNavigator();

function App() {

  return (

    <ThemeProvider theme={mainTheme}>

      <NavigationContainer>

        <Stack.Navigator initialRouteName="Landing">

          <Stack.Screen
            name="Landing"
            component={pages.Landing}
            options={{ headerShown: false }}
          />

          <Stack.Screen
            name="Login"
            component={pages.Login}
            options={{ headerShown: false }}
          />

        </Stack.Navigator>

      </NavigationContainer>

    </ThemeProvider>

  );

}

export default App;
ThemeProvider를 import한다.
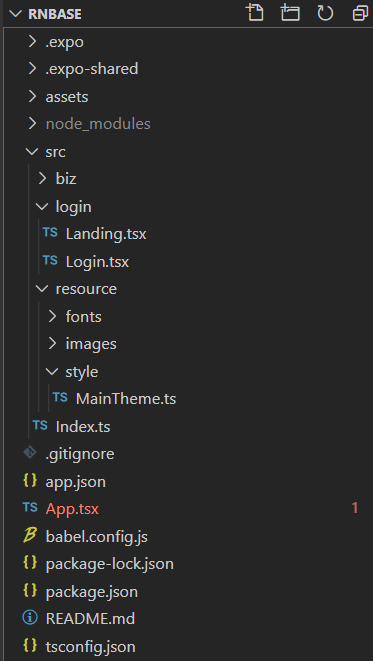
그런 다음 아래와 같이 프로젝트 구조에 style 폴더를 따로 만들 것이다.

그 밑에 MainTheme.ts 파일을 만든다.
export const mainTheme = {
    colors: {
      primary: 'rgba(45, 185, 176,1)',
      secondary:'white'
    },
    Text: {
      style: {
        fontStyle: "italic",
      }
    }
  };
그 후 자신이 프로젝트에서 주로 사용할 디자인들에 대한 정의를 해두면 된다.
일단 colors에 primary를 지정해 주면 해당 component에 직접 css를 가하지 않는 이상 primary 색으로 나타난다.
secondary는 그 다음으로 많이 사용할 색을 지정해두어 변수로 secondary만 넘겨주면 자동으로
secondary 색으로 변한다.
Text의 폰트로 무료 폰트들을 다운로드 받아서 resource 폴더에 옮겨두고 그 경로를 fontStyle로 지정해 두면 된다.
기본 내장된 폰트를 쓸 경우에는 위 코드처럼 italic 등을 지정해 두면 자동으로 그 폰트를 사용하게 된다.
이것을 위의 App.tsx에서 전역으로 <ThemeProvider theme={mainTheme}> 감싸두었기 때문에 기본적인 디자인은
자동으로 적용되는 것이다.
이렇게 해서 프로젝트의 베이스가 될 구조를 잡아 보았다.
이제 앱을 만들때 많이 쓸만한 화면 구조등을 모듈화 해서 적용해 놓고
몇개의 props만 바꾸면 적용 될 수 있도록 개발해 보겠다.
'ReactNative' 카테고리의 다른 글
| [React Native] React만 알고 React Native를 배울때 꼭 알아야할 3가지 (0) | 2021.02.14 |
|---|---|
| [React Native] ② Navigation 설정 및 프로젝트 구조 잡기 (0) | 2021.01.20 |
| [React Native] ① React Native 설치 (feat. expo) (0) | 2021.01.19 |